I have always enjoyed relaxing in a hot tub / jacuzzi / whirlpool, especially during winter holiday if there was one. What if it were possible to have such an enchanting relaxing experience on a more frequent basis, feeling at home like somewhere on a relaxing vacation. Of course, everyone might have different opinions and possibilities about the ideal tranquility space. It might be a holiday home somewhere on the beach for some, a chalet in the mountains for others. While I (still) cannot afford any of these, I was looking for more tangible options. As a family we were in agreement from the very beginning, that unlike our neighbors we didn’t want a pool in the garden. Not only because of the space limitations, but also due to the local climate that does not allow reasonable pool usage throughout the whole year. At least not without additional costs like winter pool roofing, heat pump and so on. However, with hot tubs the use case scenario is a bit different.
From my experience, there are two main categories of a personal “Jacuzzi”. One type is the typical resort style hot tub with designed seating for given number of persons, the other one is the inflatable rounded tub often seen by people’s gardens. The latter is actually not a proper jacuzzi, as it is not designed to stay outside throughout the winter season as the freezing temperatures would destroy it.
So, it seems that the only option remaining is the classic jacuzzi. There are two main problems with these, or actually three for some of us.
- These are extremely energy hungry devices. The heating is rated at least 2.5 or 3kW, and together with the pump(s) it easily reaches more than 7kW, often close to 10kW of power. No wonder that these require dedicated power circuits, the more powerful ones even three-phase (400V).
- Unfortunately, in combination with the first point, they are at the same time very poorly insulated. The acrylic base has (in the better models some sort of foam insulation, but at the same time there are tens of tiny water hoses left in the space connecting the individual jets with the pump. Most of the cheaper models don’t have almost any significant thermal insulation.
- The installation requires great access to your garden and there must be free space from all sides of the unit. That’s why you don’t see jacuzzi put into the ground unless there is a fake floor (typically terrace around it) or side access from the underneath space, which requires heavy construction prep from the very beginning.
- Expensive units in case you want to minimize the impact of the first two points. It is visible that the makers understood that the energy costs, especially after the crisis, cannot be considered as negligible. We are seeing makers starting to emphasize more the energy efficiency of their products.
I am not saying these are bad units. There can be found great products that do have their customers. Should I be picking my top brands for this category, I would probably choose Villeroy-Boch’s Design line Just Silence models for its innovative solution reducing the need underneath pipes/hoses and full foam insulation, or USSPA for their innovational swim-spa models.
It is not an inflatable hot tub
When looking for a more affordable solution, there actually is one additional category standing somewhere between the expensive acrylic design and inflatable “wannabe” jacuzzi types. And that is Softub, category of its own. It is not an inflatable hot tub, but rather a soft-sided, highly durable tub that you can set up anywhere, any time of year. Yes, even in the snow! So why is this so different?

- It is very lightweight, some people even think it is inflatable, but in fact it is made of a Polybond – high density foam which gives the product perfect thermal insulation. It can be considered portable, but at the same time tough enough that you can sit on the side edge. At the same time the material itself is a very good thermal insulator and together with the thermal cover helps minimize the heat loss to the surroundings.
- The running costs will be significantly lower compared to the typical acrylic units. In fact, the maximum power consumption is less than 1kW. And this is very interesting, because how is this even possible to maintain high water temperature with such a low power income. The answer is efficiency and insulation. Softub does not have any heating element. The water is heated by the waste heat of the circulation pump. The electrical energy supplied to the pump is transformed into the movement/circulation of water into the jets and partly into heat as the pump heats up through its operation. This heat is transferred into the water, so it can be said that all the supplied energy is used.
- There are real jets, not just bubble holes like in many inflatable models.
So, as you can see, Softub is positioned somewhere between the two most common jacuzzi types. I see it as ideal product for self-installation to places where normal jacuzzi would never be possible or the installation and preparation would be too difficult, ideal for people who live in rented / temporary places or anyone who considers changing the location of the tub (indoor/outdoor, …) and for anybody who takes care about optimizing energy costs and at the same time want all year long hot tub solution.
As usual, every advantage means also a disadvantage depending on a view angle. The low power consumption obviously means slower initial warm up. It takes one hour to increase the water temperature by one or two degrees °C depending on the environment. But once it reaches the desired temperature it maintains it well even in cold outdoor temperatures. If you are using the tub, the temperature typically drops a bit as the heat dissipation to the outside is much bigger when the pool is not covered and also the air that is mixed into the waterjets to create the massaging effect cools it down even though the pump is running. So typically, after each use it takes some time for the hydromate (this is how they call the motor unit) to return the water temperature up to the desired level.
The tub has no designed seats or seating positions. Some consider this as a con, I think it is not a big deal and potentially can be treated as an advantage. And I knew this from the very beginning. I had the opportunity to use Softub a few times before the purchase, and I purchased it during a demonstration event of the seller for a reduced/promo price.
For me personally the most serious weakness of this product is the overall control, or the impossibility of externally controlling the hot tub in any way (for example, using a superior system or photovoltaics). So no, Softub cannot be easily connected to be controlled by Loxone. 🙁 You cannot tell the Softub that throughout the day you have enough electrical energy to store it in as increased temperature and at night to use as little as possible. Allowing that would be an additional step into the super energy efficiency of this product. And yes, there are two modes allowing some kind of energy management preset, however, this is not well implemented. First, the Softub does not know the current time. You can set these modes only at the moment when you want to have these executed for the next hours. Any tiny power loss will erase that setting. And what is even worse, Softub won’t resume after any power outage. It remains waiting for you to press a button (guys please, please fix this!)
I have seen someone reverse engineering the communication between the Softub control unit and the main box. I won’t try to hack my hydromate during the warranty period, but I feel there would be a space for upgraded control panel with esp8266 and WIFI onboard.
My installation
Softub is advertised to be installed and placed almost everywhere. And it can be done so, it is almost plug&play. But because I was considering a more stable and permanent place for the Softub in my garden, I have invested some time and effort into the preparation.
Essentially, I did the following steps as a part of my prep:
- Measurement and finding the right place where to put the Softub
- Top layer of soil removal
- Relocation of an existing lawn irrigation sprinkler from the corner and adding additional one to fully cover the new remaining grass area shape.
- Preparation for hidden electrical connection incl. dedicated Modbus power meter connected to Loxone and connection for ambient lighting connected to garden light circuit.
- Two layers of XPS for insulation layer to be placed underneath the tub
- Concrete tiles as a base for the wooden surrounding and the hydromate
- Decorative stones, plants and lighting spheres for final design
Let’s share couple more details
The right place for the Softub

First, I didn’t want to place it on grass ground (nor concrete, lawn or soil) just so. I measured the unit I wanted to purchase to know where it would be the best fit in the garden. Also, the position of the hydromate, connection for mains, and the position of the seat inside the pool was important. Because I wanted to have nice and practical natural wooden surround, I had to take into consideration the side of it as well.
Removing soil
2) Once I found the right spot for placing the tub, I removed the excess clay from the lawn area and leveled the surface. The diameter I chose to remove is obviously bigger than just the diameter of the tub. It contains also space for the optional wooden surround and some additional 30 cm (about 12 in) distance for putting decorative plants, stones and lighting.

I removed the top soil layer inside the whole circle, and then gone a bit deeper in the inner circle (below the future hot tub). The reason behind this was that I planned to add extra thermal insulation below the Softub.

Sprinklers and wiring adjustments
3) Two additional things had to be taken care of. The location I chose for the tub was grass lawn before, so there are sprinklers from the automated irrigation system and also the boundary wire from robotic mower. I had to relocate the sprinkler in the corner to a new place, and then add one additional to cover the newly created corners in the lawn area.


The boundary wire had to be taken out from the ground in the affected corner, shrinking the mowing area for the robotic mower. This went worse than I expected, the perimeter wire was firmly planted in the grass, and I managed to break the wire in one place. In the end this was not such a fatal trouble, because the original length of the cable removed from the ground was not enough for the new shape, so I had to extend it anyway.
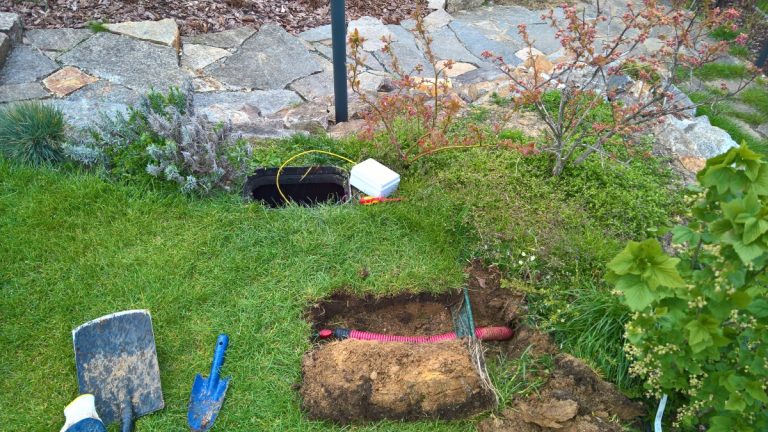
Power connection

4) The Softub can be connected into the normal power outlet (230V/10A), but I did not want to have the cables run across my yard or terrace. I have prepared an extra cable (using my underground electrical conduit cable pipes) into a ground box where I planned to have dedicated electrical socket. The box I used is the one typically used for irrigation sprinkler valves. Apart from the mains cable I put there also prepared ambient 12V lighting to be placed around the tub, which is connected to my garden light circuit.
On the indoor side of the dedicated Softub cabling I wanted to have power measurement to be able to monitor power consumption in Loxone. For this I installed Modbus power meter in the electrical cabinet.

This all happened a week before the supplier promised to deliver the unit.
Bottom insulation
5) Once all the wiring and irrigation movements are finished, final preparation for placing the Softub starts. Into the prepared hole which remained there after the soil removal I put a geotextile, preventing any seeds of weed from growing there, but more importantly to separate the underground soil from the next gravel layer added on the top, that would otherwise be pushed into the underlying clay. On the placed geotextile I then put about a ton of the fine gravel using a wheelbarrow.

Geotextile placed to separate the gravel from the soil 
XPS foam insulation cut from glued rectangular pices 
Bottom up, the geotextile glued at the bottom 
Final placement to the layer of fine gravel 
Connection underground box preparation 
Once the XPS is leveled, the outer level can be covered as well 
Adding final layer of gravel 
Wiring for lights needs to be covered as well


As I mentioned above, Softub is well insulated from the sides, the weakest and thinnest insulation is at the bottom. The bare minimum you can do to reduce energy consumption is to place the tub on a better thermally insulated surface. For this I built and glued together two layers of 5 cm (about 2 in) thick XPS foam.
I had to ask the seller to measure the bottom black mat from under the tub for me. For the Portico 300 model it had a diameter of 187 cm (about 6.14 ft). (This is the bottom black base mat, not the diameter of the tub! The tub is wider than that!)
I cut the XPS into the exact circle shape using an electric saw trying to match the Softub bottom radius. Then I placed the XPS insulation circle in position and leveled it.
Wooden surrounding
6) To prepare a solid base for hydromate and the wooden surround I used concrete tiles. Under the motor 50 cm (about 1.64 ft) square tile is a great fit, for the surround legs I had to improvise a bit. Because there was no drawing that would describe the positions, I had to reposition these tiles once the tub arrived. Obviously having these tiles leveled with the central XPS circle is a key.

The wooden circle around Softub is gorgeous. The lower cedar step helps entering the tub. It was wise to place it at the same side as the heightened seats inside the tub. This ensures easy entry in and exit. I applied impregnating transparent decking oil to extend the lifespan of the cedar ring.
Finalization of the design
7) Final design touch was done using brown decorative aggregate from a local quarry that I brought in bags in the trunk of my car. My back will thank me. Larger flat andesite stones were used as stepping stones.

Two stone looking spheres as a decorative light I had to convert to 12V to maintain decent safety level, even though they come with IP68. But you never know what can happen, so rather to be safe than sorry with any electricity near pool of jacuzzi. Finally, some plants were added as well.


but also few plants were added to the surround space

Final installation
On the day of the Softub installation everything went smoothly. It was very easy to carry the box with the new hot tub from the truck in front of the house to the back garden.


First observations and experience
Here are few observations and details from my initial experience.
- We do not regret buying Softub in any way, even though I think it is a bit overpriced even if I factor in the retailer’s discounts.
- The initial water warm-up takes a bit of time, the water temperature will rise at about 1 – 2 °C per hour, depending on the model and ambient conditions.
- The maximum normal setting for the temperature is 40 °C (104 °F). However, there is a Special Temperature Mode that will allow the temperature to be set to 41 °C (106 °F).
- Consumption wise, the Softub takes 4 Watts when in idle/standby state, and slightly oscillates around 900 Watts (899-919W) when the hydromate pump is in operation.
- The huge “Poseidon jet” is really very powerful and is great to massage my back. I think I haven’t experienced such a powerful jet on normal hot tubs. It is a massive water stream.
- You can hear the hydromate in operation, but it is not any annoying noise. It is rather lower frequency pitched hum. It is surely much quieter than our neighbor’s pool filtration.
- The biggest pain I have with the RCD (residual current device) which is a part of the original supply cord and cannot be removed without voiding the warranty. I know why it is there (as a life-saving device which is designed to prevent you from getting a fatal electric shock if you touch something live, such as a bare wire), but every newer home installation has these in the electric cabinets anyway. The RCD that is supplied with Softub on the mains cord is super annoying. Any tiny power drop, even 10ms when PV system goes from grid to batteries makes the Softub go offline. And then you must manually turn the RCD back on to restart the Softub, which means that all settings are lost, of course. I will need to add extra monitoring in Loxone to tell me if Softub consumption is 0 W to trigger announcement that Softub is off. Especially during freezing temperatures this is a bit dangerous behavior.
- The control panel desperately needs an update, there is currently no way to tell my Softub that there is a period for potential pre-heating/storing energy into water (when solar panels have lots of power), and when to avoid automated operation unless it’s really necessary. I am using the 12hrs “Overnight Mode”, but after several resets I am slowly giving up setting that configuration back again and again. This requires significant improvement, please!!!
- The thermal cover is great, it contributes well to overall thermal efficiency, but it is not lightweight. Kids for instance won’t be able to move it around. But that’s probably an advantage. I fully recommend purchasing the aluminum stand for the top cover.
- Softub (like probably any other hot tub) is not a maintenance-free device. Water treatment is an important factor in the enjoyment of your Softub Spa. Proper water maintenance is essential for the health of your friends and family as well as for permitting years of trouble-free use of your Softub Spa. There is a chemical kit that must be used regularly.

Detailed look at the energy consumption of Softub

Because I have dedicated Modbus meter installed, I have direct overview of the Softub consumption. As I mentioned above, Softub does not have any water heater. It uses the waste heat produced by the pump during operation to warm up the water. This way vast majority of the energy is transferred to the water in the tub.
Pump has to be running if there is a need to increase the water temperature and/or water filtration. According to the manual, Softub is set to run two 15-minute filtration cycles in a 24 hour period. These will run every 12 hours and are set when the spa is first plugged in. The filtration cycle will only run if there has been no heat call in the prior 12 hours. If there has been a heat call, the filtration cycle will be skipped, saving you money.
I do not have annual total yet, as I just installed the Softub this year in July, but here are the summary data for the first three months:
| Month | Softub consumption [kWh] |
|---|---|
| July 2023 | 124 kWh |
| August 2023 | 105 kWh |
| September 2023 | 119 kWh |

From my data you can see, that Softub has consumed 3,96 kWh of electricity per day on average this September. I need to admit that I have been changing the water at the beginning of the month, which is why there was the initial spike in the consumption. Will see how this will look like going forward. It is kind of expected, that during winter season the energy consumption will increase. Together with less output from the photovoltaic system (shorter days, less sun) this will surely result in higher overall energy costs.
But there are additional factors that play significant role in the total bill. Mostly the hot tube usage time, when there is no top cover and air is mixed into the water jets, but also the water temperature setting. This September we had 38.5°C (101.3 Fahrenheit) set, but we might go higher during winter.
I will definitely post an update after the full winter season to provide the full season experience. I hope you find this useful.
October 17th 2023 update: So we have here the first freezing temperatures outside. This photo was taken in the morning, when there was still just around freezing temperature (0°C ~ 32F), and the water temperature inside the Softub is set to 39°C ~ 102F).

I think the insulation cover works pretty well, if we consider that there is a frost building up on the top of the cover where underneath there is hot water. Obviously, you can see the weak spots around the bend of the cover, where the heat has a bit easier way to get up to the surface.
Read further
- Softub energy efficiencyHave you ever wondered how energy efficient a Softub is, or how long it takes to warm the water up? Unlike most hot tubs, Softub has no dedicated heating element. Instead, it uses waste heat from the pump motor to warm the water, which is in a sense very clever design. On the other hand,…
- Softub water treatment: chlorine, bromine, or PHMG?A practical, real-world look at Softub water chemistry after testing chlorine-free PHMG and returning to dichlor. Covering maintenance, smell, pH stability, liner impact, and what actually works in a hot tub.
- Softub installationI have always enjoyed relaxing in a hot tub / jacuzzi / whirlpool, especially during winter holiday if there was one. What if it were possible to have such an enchanting relaxing experience on a more frequent basis, feeling at home like somewhere on a relaxing vacation. Of course, everyone might have different opinions and…
What could we do better?