If you use Synology NAS and have some IP cameras installed, this might be interesting topic for you. I was looking for a way how to get snapshot from the camera on certain events from Loxone. In this forum someone found a way how to get the actual image from Surveillance Station. All you need is to have PHP interpreter package installed on your Synology and PHPMailer downloaded to your web folder. Whenever you call the script below, it sends an email to defined recipients with attached image from the IP camera.
I just slightly modified the script to allow more than one recipient of the mail. To make this work for you just change the location of the PHPMailer according to your location in the web directory tree, replace all placeholders like <synology_ip>, <port> usually 5000, <login>, <password>, smtp server address, email recipients, subject, body of the message and few other details. Next place this updated PHP script in the folder of your web server on Synology.
|
<?php require '../PHPMailer/PHPMailerAutoload.php'; // Path to the PHPMailer script $cookieFile = "session_cookie.txt"; $ch = curl_init(); curl_setopt($ch, CURLOPT_COOKIEJAR, $cookieFile); curl_setopt($ch, CURLOPT_URL,"http://<synology_ip>:<port>/webapi/auth.cgi?api=SYNO.API.Auth&method=Login&version=1&account=<login>&passwd=<password>&session=SurveillanceStation"); curl_exec ($ch); curl_close ($ch); unset($ch);
$ch = curl_init('http://<synology_ip>:<port>/webapi/_______________________________________________________entry.cgi?api=SYNO.SurveillanceStation.Camera&method=GetSnapshot&version=1&cameraId=<id>'); curl_setopt($ch, CURLOPT_RETURNTRANSFER,1); curl_setopt($ch, CURLOPT_COOKIEFILE, $cookieFile); $fp = fopen('camera_snapshot.jpg', 'wb'); curl_setopt($ch, CURLOPT_FILE, $fp); curl_setopt($ch, CURLOPT_HEADER, 0); curl_exec($ch); curl_close($ch); fclose($fp); unset($ch);
$fileatt = "camera_snapshot.jpg"; // Path to the file $fileatt_type = "image/jpg"; // File Type $fileatt_name = "camera_snapshot.jpg"; // Filename that will be used for the file as the attachment $email_from = "<email name>"; // Who the email is from
$mail = new PHPMailer;
//$mail->SMTPDebug = 3; // Enable verbose debug output
$mail->isSMTP(); // Set mailer to use SMTP $mail->Host = '<smtp_server>'; // Specify main and backup SMTP servers $mail->SMTPAuth = false; // Enable SMTP authentication $mail->Username = ''; // SMTP username $mail->Password = ''; // SMTP password $mail->SMTPSecure = 'tls'; // Enable TLS encryption, `ssl` also accepted $mail->Port = 25; // TCP port to connect to
$mail->From = '<from_email>'; $mail->FromName = '<from_name>'; $mail->addAddress('<to_email_1>', '<to_name_1>'); // Add a recipient 1 $mail->addAddress('<to_email_2>', '<to_name_2>'); // Add a recipient 2
$datum = Date("j-m-Y_H:i:s", Time());
$mail->addAttachment('camera_snapshot.jpg', 'snapshot_'.$datum.'.jpg'); // Optional name $mail->isHTML(false); // Set email format to HTML
$mail->Subject = '<email_subject>'; $mail->Body = '<email_body_text>'; $mail->SMTPOptions = array( 'ssl' => array( 'verify_peer' => false, 'verify_peer_name' => false, 'allow_self_signed' => true ) );
if(!$mail->send()) { echo 'Message could not be sent.'; echo 'Mailer Error: ' . $mail->ErrorInfo; } else { echo 'Message has been sent'; }
$ch = curl_init(); curl_setopt($ch, CURLOPT_RETURNTRANSFER,1); curl_setopt($ch, CURLOPT_COOKIEFILE, $cookieFile); curl_setopt($ch, CURLOPT_URL,"http://<synology_ip>:<port>/webapi/auth.cgi?api=SYNO.API.Auth&method=Logout&version=1&session=SurveillanceStation"); curl_exec ($ch); curl_close ($ch); unset($ch);
unlink($cookieFile); unlink($fileatt); ?>
|
Now you can try to debug and test this by executing the script from your browser. If all works, next part is to create virtual output in Loxone Config to be able to trigger the script by certain events.
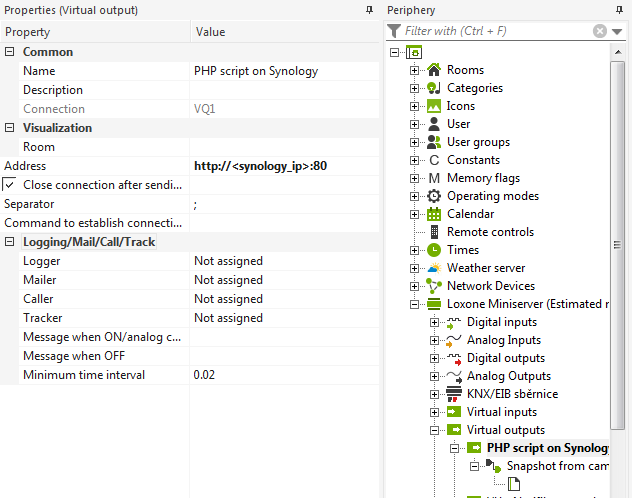
Just add new virtual output, modify your IP address of the Synology NAS, and add the path tho the script to be executed when this output is ON.
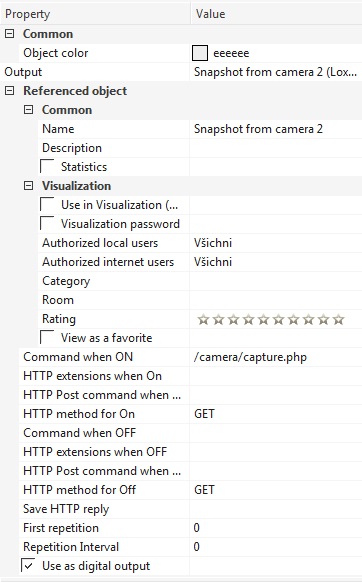
Now you can trigger this output by any action you like, for instance when the door is open, movement registered, alarm disarmed, anything you like.
Here is the Web API documentation ver 2.0 from Surveillance Station