
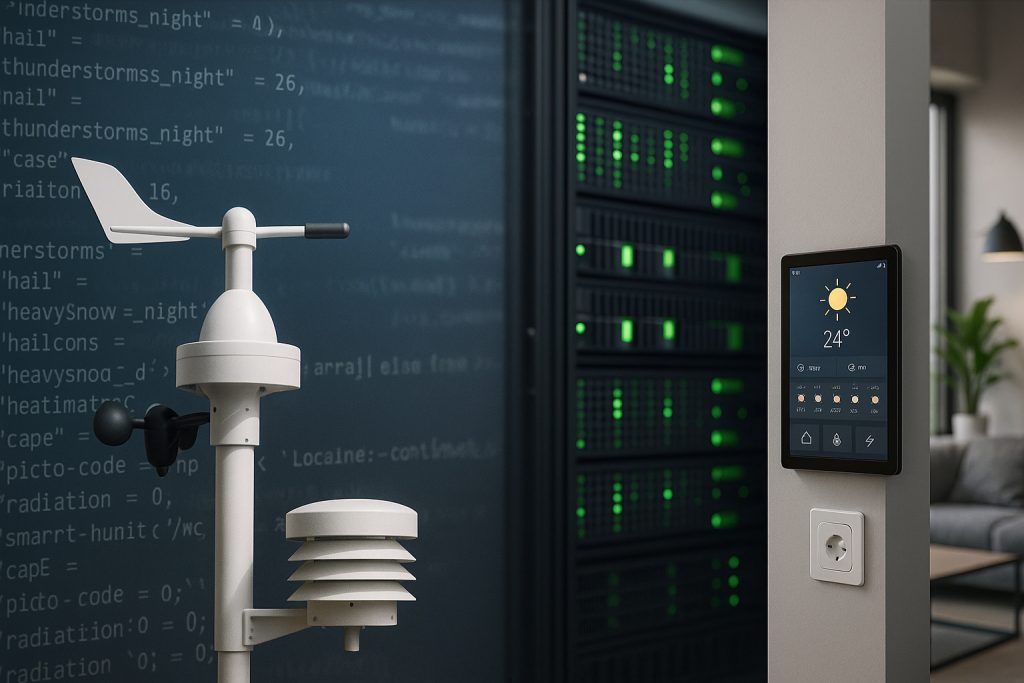
Loxone’s official Weather Service is convenient, but it’s a paid and closed system. People typically bundle the purchase together with the Weather station, but that wasn’t the case back then. If you’re happy to manage your own forecast source (for example from a public API like MET Norway’s Locationforecast), you can emulate the official service locally and feed the Miniserver with your own data. So, how to feed your Miniserver with your own forecast data?
This article shows the concept and data format you need — in a generic, anonymized way — so you can reproduce it at home. The core concept is to intercept every request the Loxone Miniserver sends to the Weather Service, reroute it to our locally hosted script, and deliver a response in the expected format.
TL;DR – How this works in practice:
- The Loxone Miniserver fetches weather via
http://weather.loxone.com/forecast/?format=2. - You override that hostname on your router so it resolves to your local server instead of the internet.
- A small PHP endpoint on your home server pretends to be the Weather Service and outputs Weather4Loxone CSV.
- Another script (via cron) regularly downloads real forecast data from a public API (Yr.no / Open-Meteo / OWM) and caches it as JSON.
- The emulator transforms this cached forecast into the exact structure Loxone expects.
- No cracking, no MITM, no HTTPS issues — just DNS redirection + your own data formatting.
- This is for tinkerers. If you want a turnkey solution, the official Loxone Weather Service is still the way to go.
What you will need to get started
To mimic the Loxone Weather Service on your own, you need:
1. Network & Infrastructure
- A home network where you can override DNS (e.g. redirect a hostname to a local IP)
- A device that can run:
- PHP scripts (Synology NAS, small Linux server, Raspberry Pi, etc.)
- Cron / scheduler (to run scripts periodically)
2. Local PHP Environment
- Web server with PHP (Apache / Nginx / lighttpd, doesn’t matter)
- CLI PHP (for cron jobs) is a plus
The truth is, it does not need to be PHP. Python paired with a tiny Flask HTTP service will probably do the same. So feel free to use what you have available at home and what you can safely work with.
You’ll have to build two scripts:
- Backend scripts (run via cron), which:
- Fetch forecast from a public API (e.g. Yr.no / MET Norway)
- Cache it to JSON
- Optionally read local sensors (rain, temperature, humidity) via Loxone’s API for your own logic
- HTTP endpoint (weather emulator), which:
- Reads the cached forecast JSON (and optionally current sensor JSON)
- Outputs Weather4Loxone CSV in exactly the format the weather block expects
The last bullet was actually where I spent most of my time debugging this, because there was no SDK-like description of exactly how the response should be structured. Moreover, I found contradicting information on the web, probably dating to earlier versions of the service and referring to a different type of response.
3. Public Weather Source
Any free weather API that gives you at least:
- Hourly temperature
- Precipitation (mm)
- Cloud cover or condition icon
- Pressure
- Humidity
- Wind speed & direction
4. Loxone Miniserver with Weather Server enabled
You need:
- A Weather server (enabled in the Loxone config to be visible in the user interface)
- You can also use the individual values in your programming logic later on
How does it work?
This might slightly vary depending on the Loxone Miniserver generation, but in all cases it boils down to:
Loxone does an HTTP GET → your local PHP script → script returns Loxone’s weather response → Miniserver uses it as if it came from the official server.
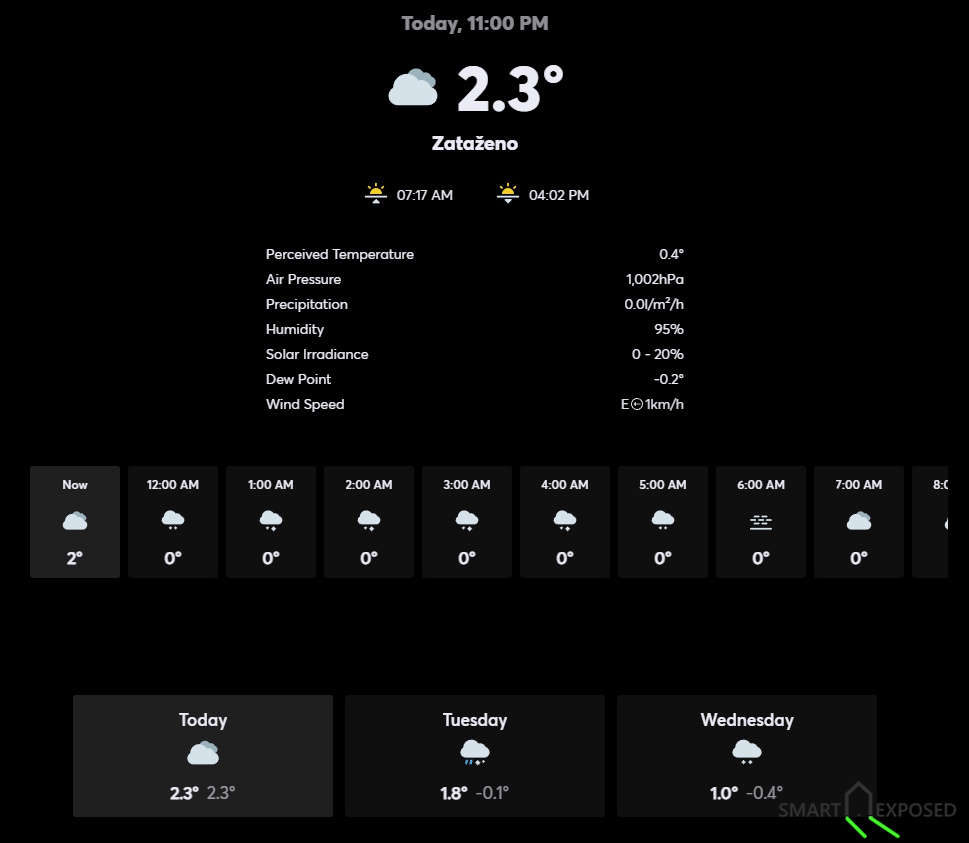
My local logs indicate that the request for an updated weather forecast is triggered once per hour. This is when normally the Loxone’s weather server would get the request and respond back by sending updated weather forecast if you have subscribed to the paid service. The request looks like this:
[2025-11-07 23:10:53] [weather_emulator] Request from <Miniserver-IP> GET /forecast/?user=loxone_<Miniserver-ID>&coord=xx.xxx,yy.yyy&asl=zzz&format=2&new_api=1
- user=loxone_<Miniserver-ID> is a Miniserver identifier/token, you can safely ignore it in your script; we just log it for debugging if we want
- coord=xx.xxx,yy.yyy are coordinates of the installation (xx.xxx is the longitude, yy.yyy is the latitude, 16.371° E, 48.208° N as an example). This is taken from your Loxone Config project setting. Again no need to parse, unless you want to serve forecasts for different locations, so we’ve been ignoring it.
- asl (zzz) is the altitude above sea level, in meters. Again this is in config.php (used for sea-level pressure calc).
- format=2 tells your script which output format Loxone wants. 2 = Weather4Loxone CSV (the <mb_metadata> … <station> stuff we’re generating). We explicitly handle this in weather_emulator.php but I expect only “2” to be requested.
- new_api=1 is just a flag Loxone uses to indicate the “new” weather API. We don’t need it; can ignore it
Implementation
Step 1 – Fetch and Cache the Forecast
You need to decide where you get the weather forecast for your region. There are various services available, some are better and more accurate, others are free. It is typically a tradeoff between what the service can provide, how often you can query their API (usage limits), and the effort and costs.
Initially I tried to get everything from Weather Underground. Since I upload my local weather data there every 5 minutes as a PWS (Personal Weather Station), I’m allowed to use their forecast API in return. I spent days debugging issues and trying to map daypart[0] to the correct part of the day, but the fuzziness of the responses (sometimes null) made the forecasts fragile and inaccurate. In the end I found out that, from the set of APIs Weather Underground provides to PWS contributors, you can only use the official 5-day forecast.
You cannot get official WU hourly forecast data using any “PWS Contributor” endpoint. So this was a roadblock – I had to look elsewhere.
Where to get it?
1. Yr.no / MET Norway API (Met.no)
- Free: Yes, with generous free usage for non-commercial use
- Limits: Current terms allow reasonable use for personal/home projects (somewhere around 10,000 calls/month; they do not cut off small home projects)
- Data: 10-day forecast, hourly and 6-hourly forecasts, min/max temps, precipitation, wind, cloud cover, icon, sunrise/sunset, etc.
- Region: Global coverage, high-quality for Europe!
- Docs: MET API Docs
- API Example:
https://api.met.no/weatherapi/locationforecast/2.0/compact?lat=48.2080&lon=16.3710 - Downsides: Requires setting a custom User-Agent HTTP header (your email or project URL)
2. Open-Meteo
- Free: 100% free for non-commercial use
- Limits: No API key, no signup, but “fair use” applies (many users run this for home automation, no problems)
- Data: Hourly, daily, min/max, precipitation, wind, weather codes/icons, sunrise/sunset, etc.
- Region: Global
- Docs: API Docs
- API Example:
https://api.open-meteo.com/v1/forecast?latitude=48.2080&longitude=16.3710&hourly=temperature_2m,precipitation,weathercode,cloudcover,windspeed_10m - Downsides: No “current”/nowcast, only forecast (but you can use the next hour as current)
3. OpenWeatherMap
- Free tier: API key, 1,000 calls/day on the free plan
- Data: Current, hourly (48h), daily (7d), min/max, precipitation, wind, weather code, icon, etc.
- Docs: API Docs
- API Example:
https://api.openweathermap.org/data/3.0/onecall?lat=48.2080&lon=16.3710&appid=YOUR_API_KEY&units=metric - Downsides: Need to sign up for a (free) account, occasionally busy, but works well
4. Meteomatics (Pro-grade, free for some non-commercial uses)
- Data: Full nowcast/forecast, huge parameter set
- Limits: Need registration, more complex
- Docs: API Docs
- Use if: You want absolute pro-grade data and can deal with registration
5. Others
- Visual Crossing: Good global data, free tier, detailed docs
- Tomorrow.io (formerly ClimaCell): Free for 500–1,000/day, but sign-up required
- Weatherbit.io: Decent, free for 500/day, hourly data, needs signup
- and surely many more I don’t even know about.
From these all I picked Yr.no to try first, because I already used their weather app on my mobile, and felt it is the best balance of free, reliable, accurate, and hassle-free hourly data in Europe!
In the end you need to have a script that fetches regularly (every 30 minutes) the forecast from one of the services you choose to use via their public API. You’ll store the response locally in a JSON file, e.g. cache_forecast.json. Please, respect your provider’s rate limits and User-Agent requirements. Don’t hit the API every time Loxone asks for weather – always serve from the cache.
Step 2 – Weather Emulator endpoint
This is the core two-piece setup:
- Configure DNS/port forwarding so that
weather.loxone.com/forecast/actually hits our local PHP script - And that PHP script which Loxone will call that responds in the same CSV format Loxone expects
The DNS forwarding needs to be done on your router, and you’ll need to check if the device you have is capable to do this and how exactly to set it up.
For the Loxone Miniserver to consume your local weather emulator, you need to make sure that any request to weather.loxone.com is not resolved to the real internet IP, but instead resolved to your local server’s LAN IP, e.g.: weather.loxone.com → 192.168.1.10 (your Synology NAS or other PHP host). This is done using DNS rewriting / overriding on your router. No HTTPS interception is required, because the Miniserver uses plain HTTP for the weather API.
Basic Principle
- Your router normally forwards DNS queries upstream (ISP or 8.8.8.8).
- Loxone Miniserver asks your router:
→ “What is the IP ofweather.loxone.com?” - Your router must override the answer and always reply with:
→weather.loxone.com = 192.168.1.10(as an example)
This is called DNS Override, DNS Host Mapping, DNS Rebinding or Static DNS Entry, depending on the router manufacturer.
Ubiquiti EdgeRouter / EdgeOS
- Create a static DNS host-mapping:
weather.loxone.com → <local IP>under Config Tree → service → dns → static-host-mapping.
Ubiquiti UniFi (UDM/UDR)
Add a DNS Host Mapping in Settings → Services → DNS → Host Mappings pointing weather.loxone.com to <local IP>.
Zyxel (Standalone)
Define a Static DNS entry in Configuration → System → DNS → Static DNS: weather.loxone.com = <local IP>.
Zyxel Nebula
Use Gateway → Security Service → DNS Rewriting to map weather.loxone.com to <local IP>.
ASUS / ASUS Merlin
Add a DNS Local Database entry (LAN → DNSFilter / DDNS) overriding weather.loxone.com with <local IP>.
pfSense
In Services → DNS Resolver → Host Overrides, create an override mapping weather.loxone.com to <local IP>.
OPNsense
Create a Host Override in Services → Unbound DNS → Overrides mapping weather.loxone.com → <local IP>.
Mikrotik RouterOS
Add a static DNS record under IP → DNS → Static: weather.loxone.com → <local IP>.
Fritz!Box
Enable DNS Rebind Protection exceptions and add a Local DNS Host entry assigning weather.loxone.com → <local IP>.
OpenWrt
Set a static DNS entry in Network → DHCP and DNS → Hostnames: weather.loxone.com → <local IP>.

Common Pitfall!
❗ Miniserver must use the router as DNS. If you have done this properly, then from any device inside your LAN (including your NAS) this command:
nslookup weather.loxone.com
should return:
Name: weather.loxone.com
Address: 192.168.1.10 (your local IP)
If you still get a public IP, your override didn’t apply.
If you have done that properly, then your local PHP server now receives from Loxone Miniserver:
GET /forecast/?user=loxone_xxx&coord=long,lat&asl=height&format=2&new_api=1
Now the task is to provide the correct response.
Structure of the response
For format 2 Loxone expects something like:
<mb_metadata>
id;name;longitude;latitude;height (m.asl.);country;timezone;utc-timedifference;sunrise;sunset;
local date;weekday;local time;temperature(C);feeledTemperature(C);windspeed(km/h);winddirection(degr);wind gust(km/h);low clouds(%);medium clouds(%);high clouds(%);precipitation(mm);probability of Precip(%);snowFraction;sea level pressure(hPa);relative humidity(%);CAPE;picto-code;radiation (W/m2);
</mb_metadata>
<valid_until>2049-12-31</valid_until>
<station>
27.07.2025;Sun;18;19.3;19.3;4;330;0;0;100;0;0.0;0;0.0;1007;77;0;22;
...
</station>
Each line inside <station> represents one hourly forecast slot and contains:
- local date (e.g. 27.07.2025)
- weekday (e.g. Sun)
- local time – hour only (e.g. 18)
- temperature(C) (e.g. 19.3)
- feeledTemperature(C) – you can use same as temperature initially
- windspeed(km/h) – convert from m/s if your API uses that
- winddirection(degr) (e.g. 330)
- wind gust(km/h) – 0 or best estimate
- low clouds(%) – can be 0 for simple setup
- medium clouds(%) – you can map from cloud_area_fraction
- high clouds(%) – can be 0 for simple setup
- precipitation(mm) – per hour total
- probability of Precip(%) – 0 or 100 initially (simple)
- snowFraction – 0.0
- sea level pressure(hPa) (e.g. 1007)
- relative humidity(%)
- CAPE – 0
- picto-code – Loxone’s numeric weather icon code
- radiation (W/m2) – 0 for now (until your source provides it)
You don’t need all of these to be perfect; Loxone will happily work if some columns are “best effort” or even hard-coded to 0. The real example, that needs to respond on port 6066 is below.
http://<Local_IP>:6066/forecast/
<mb_metadata> id;name;longitude;latitude;height (m.asl.);country;timezone;utc-timedifference;sunrise;sunset; local date;weekday;local time;temperature(C);feeledTemperature(C);windspeed(km/h);winddirection(degr);wind gust(km/h);low clouds(%);medium clouds(%);high clouds(%);precipitation(mm);probability of Precip(%);snowFraction;sea level pressure(hPa);relative humidity(%);CAPE;picto-code;radiation (W/m2); </mb_metadata> <valid_until>2049-12-31</valid_until> <station> 10.11.2025;Mon;22;2.1;2.1;1;351;0;0;56;0;0.0;0;0.0;1017;99;0;16; 10.11.2025;Mon;23;1.6;1.6;1;331;0;0;64;0;0.0;0;0.0;1017;99;0;16; 11.11.2025;Tue;00;1.4;1.4;1;344;0;0;98;0;0.0;0;0.0;1017;100;0;16; 11.11.2025;Tue;01;1.4;1.4;2;351;0;0;98;0;0.0;0;0.0;1017;100;0;16; 11.11.2025;Tue;02;1.7;1.7;2;351;0;0;100;0;0.0;0;0.0;1017;100;0;16; 11.11.2025;Tue;03;1.5;1.5;1;1;0;0;100;0;0.0;0;0.0;1017;100;0;16; 11.11.2025;Tue;04;1.2;1.2;1;8;0;0;100;0;0.0;0;0.0;1017;100;0;16; 11.11.2025;Tue;05;1.8;1.8;1;42;0;0;100;0;0.0;0;0.0;1017;100;0;16; 11.11.2025;Tue;06;2.0;2.0;0;172;0;0;100;0;0.0;0;0.0;1018;100;0;16; 11.11.2025;Tue;07;2.4;2.4;1;236;0;0;100;0;0.0;0;0.0;1018;99;0;16; 11.11.2025;Tue;08;3.2;3.2;1;200;0;0;100;0;0.0;0;0.0;1018;98;0;16; 11.11.2025;Tue;09;3.9;3.9;2;190;0;0;100;0;0.0;0;0.0;1019;98;0;16; 11.11.2025;Tue;10;4.4;4.4;2;203;0;0;100;0;0.0;0;0.0;1019;98;0;16; 11.11.2025;Tue;11;4.7;4.7;2;199;0;0;99;0;0.0;0;0.0;1019;95;0;22; 11.11.2025;Tue;12;6.2;6.2;2;207;0;0;100;0;0.0;0;0.0;1018;85;0;22; 11.11.2025;Tue;13;7.0;7.0;2;174;0;0;92;0;0.0;0;0.0;1018;82;0;22; 11.11.2025;Tue;14;6.9;6.9;2;165;0;0;59;0;0.0;0;0.0;1018;83;0;14; 11.11.2025;Tue;15;5.0;5.0;1;188;0;0;98;0;0.0;0;0.0;1018;92;0;7; 11.11.2025;Tue;16;4.1;4.1;1;232;0;0;99;0;0.0;0;0.0;1018;94;0;7; 11.11.2025;Tue;17;3.9;3.9;1;297;0;0;100;0;0.0;0;0.0;1019;95;0;22; 11.11.2025;Tue;18;3.6;3.6;1;204;0;0;100;0;0.0;0;0.0;1019;96;0;22; 11.11.2025;Tue;19;4.0;4.0;1;282;0;0;100;0;0.0;0;0.0;1019;95;0;22; 11.11.2025;Tue;20;3.4;3.4;1;339;0;0;100;0;0.0;0;0.0;1020;96;0;7; 11.11.2025;Tue;21;2.6;2.6;1;339;0;0;83;0;0.0;0;0.0;1020;98;0;7; 11.11.2025;Tue;22;1.8;1.8;1;336;0;0;71;0;0.0;0;0.0;1020;99;0;7; 11.11.2025;Tue;23;1.0;1.0;2;329;0;0;99;0;0.0;0;0.0;1021;99;0;16; 12.11.2025;Wed;00;0.5;0.5;2;327;0;0;42;0;0.0;0;0.0;1021;98;0;16; 12.11.2025;Wed;01;0.0;0.0;1;332;0;0;46;0;0.0;0;0.0;1021;98;0;16; 12.11.2025;Wed;02;-0.3;-0.3;2;338;0;0;52;0;0.0;0;0.0;1021;99;0;16; 12.11.2025;Wed;03;-0.2;-0.2;2;351;0;0;61;0;0.0;0;0.0;1021;99;0;16; 12.11.2025;Wed;04;0.0;0.0;2;359;0;0;69;0;0.0;0;0.0;1021;99;0;16; 12.11.2025;Wed;05;-0.1;-0.1;1;21;0;0;81;0;0.0;0;0.0;1022;99;0;16; 12.11.2025;Wed;06;0.2;0.2;1;38;0;0;100;0;0.0;0;0.0;1022;98;0;16; 12.11.2025;Wed;07;1.2;1.2;1;45;0;0;100;0;0.0;0;0.0;1023;99;0;16; 12.11.2025;Wed;08;2.1;2.1;1;58;0;0;100;0;0.0;0;0.0;1023;98;0;16; 12.11.2025;Wed;09;3.1;3.1;1;84;0;0;100;0;0.0;0;0.0;1023;97;0;16; 12.11.2025;Wed;10;4.0;4.0;1;113;0;0;100;0;0.0;0;0.0;1023;96;0;16; 12.11.2025;Wed;11;4.9;4.9;2;109;0;0;100;0;0.0;0;0.0;1023;92;0;22; 12.11.2025;Wed;12;5.8;5.8;1;123;0;0;100;0;0.0;0;0.0;1022;89;0;22; 12.11.2025;Wed;13;5.9;5.9;2;120;0;0;100;0;0.0;0;0.0;1022;89;0;22; 12.11.2025;Wed;14;5.8;5.8;2;143;0;0;100;0;0.0;0;0.0;1022;90;0;22; 12.11.2025;Wed;15;5.1;5.1;1;170;0;0;98;0;0.0;0;0.0;1022;95;0;22; 12.11.2025;Wed;16;4.6;4.6;1;278;0;0;99;0;0.0;0;0.0;1022;97;0;22; 12.11.2025;Wed;17;4.1;4.1;1;311;0;0;78;0;0.0;0;0.0;1022;99;0;7; 12.11.2025;Wed;18;2.9;2.9;1;345;0;0;42;0;0.0;0;0.0;1022;100;0;7; 12.11.2025;Wed;19;2.2;2.2;1;13;0;0;99;0;0.0;0;0.0;1022;100;0;16; 12.11.2025;Wed;20;1.9;1.9;1;104;0;0;100;0;0.0;0;0.0;1022;100;0;16; 12.11.2025;Wed;21;2.4;2.4;2;164;0;0;100;0;0.0;0;0.0;1022;100;0;16; 12.11.2025;Wed;22;3.0;3.0;2;182;0;0;100;0;0.0;0;0.0;1022;99;0;16; 12.11.2025;Wed;23;3.4;3.4;1;128;0;0;100;0;0.0;0;0.0;1022;99;0;16; </station>
Mapping API Data → Loxone CSV
Inside weather_emulator.php you:
- Load cache_forecast.json
- Extract $timeseries = $cache[‘data’][‘properties’][‘timeseries’];
For each timeseries entry:
 $dt = new DateTime($entry['time'], new DateTimeZone('UTC'));
// IMPORTANT: keep as UTC – Loxone will convert to local
$date_str = $dt->format('d.m.Y');
$weekday  = $weekdayNames[$dt->format('w')];
$hour     = $dt->format('H');
$details  = $entry['data']['instant']['details'] ?? [];

$temp     = $details['air_temperature'] ?? 0;
$pressure = $details['air_pressure_at_sea_level'] ?? 1017;
$humidity = $details['relative_humidity'] ?? 0;
$wind_ms  = $details['wind_speed'] ?? 0;
$wind_kmh = round($wind_ms * 3.6);
$wind_deg = round($details['wind_from_direction'] ?? 0);
$clouds   = round($details['cloud_area_fraction'] ?? 0);

$precip   = $entry['data']['next_1_hours']['details']['precipitation_amount'] ?? 0;
$prob     = $precip > 0 ? 100 : 0;

$symbol_code = $entry['data']['next_1_hours']['summary']['symbol_code']
    ?? $entry['data']['next_6_hours']['summary']['symbol_code']
    ?? $entry['data']['next_12_hours']['summary']['symbol_code']
    ?? "unknown";

$icon = map_yrno_icon($symbol_code);  // your own mapping table
Print out the CSV line:
 printf(
    "%s;%s;%02d;%.1f;%.1f;%d;%d;%d;%d;%d;%d;%.1f;%d;%.1f;%d;%d;%d;%d;\n",
    $date_str, $weekday, $hour,
    $temp, $temp,
    $wind_kmh, $wind_deg, 0,       // gusts 0 for now
    0, $clouds, 0,                 // low/hi clouds 0
    $precip, $prob, 0.0,           // snowFraction = 0
    round($pressure,1), $humidity,
    0,                             // CAPE = 0
    $icon,                         // pictocode
    0                              // radiation
);
Icon mapping is a static array like:
 $Yrno2LoxoneIcon = [
    "clearsky_day"     => 1,
    "clearsky_night"   => 2,
    "partlycloudy_day" => 14,
    "cloudy"           => 22,
    "rain"             => 23,
    "lightrain"        => 33,
    "snow"             => 24,
    "unknown"          => 22,
];

function map_yrno_icon($code) {
    global $Yrno2LoxoneIcon;
    return $Yrno2LoxoneIcon[$code] ?? 22;
}
You can start with just a few mappings and expand later. At the end I will provide link to a full script example, where I tried to map all possible conditions to an icon. I used various internet sources, but sometimes there were not consistent information provided. So in the end I had to experimentally validate proper icon mapping and its appearance.
See next page for the detailed scripts —>