If you want to treat your garden really seriously, automated irrigation system is a must have for you. Yes of course, there are possibilities to align your planting selection to the local conditions, but to get really the most of your garden, you may want to have nice lawn, some fruit bushes/trees and possibly some of your own grown vegetables as well. Depending on the area you live you can do wise selection of plants to your garden/yard but automated irrigation might be something worth thinking at the first place.
There are many out of box solutions on the market these days. These usually consist of a control unit, irrigation supply pipes, micro supply pipes, solenoid manifold and valves, sprinklers, drip hoses, and some additional clips, fittings and adapters. These devices then live their own life, so you have to make sure you set everything properly (like the irrigation time for each of the section), and if you want to be really precise, some temperature, soil humidity and rain sensor needs to be attached as well.
Any programming changes needs to be done on the controlling unit directly, which means to go to the control unit every time you need to do any adjustments to time, watering duration for each garden section, or temporary irrigation override due to late evening garden party.
The whole system can easily become really complex for maintenance, and having multiple of such things to care about (pool, sauna, garden, aquarium, …) multiplies the time you need to spend programming these devices. Taking this to extreme, it may end up as a task for permanent external employee to maintain all these things.
My requirements
- Fully integrated control of the garden irrigation system by smart home system
- Three individual watering sections
- Use of rain water from the tank
- Ability to top-up the water in the tank in case of longer dry periods
- Maintenance free* design
Watering the garden controlled by your smarthome
Integrating garden irrigation system into my smart home installation was an obvious requirement to get the advantage of centralised management, global events that influence the behaviour of the system and the fact that you can use the data you already have in the system to initiate any action.
Initially my idea was to let some specialized company to do the design and implementation of the whole irrigation system. As usual, they would want to sell me the whole system including the control unit, all the additional sensors, and scheduled regular (paid) maintenance. By maintenance they usually mean preparation for winter shutdown period (simple blowing the pipes with compressed air) and then inspection before the start of a new season. After some research, I decided to do the installation by myself (which turned out to be a good decision).
Let me demonstrate my thinking behind the real installation I did myself here. The garden I have is literally small piece of ground. Nevertheless, I wanted to split it into three designated areas with different irrigation requirements.
Defining the areas and watering requirements
In my case, there are three different parts of my garden:
- Nice green lawn
- Decorative garden
- Seasonal vegetable garden
For each of the area you’ll need to think about the best ways how to spread the water around the particular area.
Lawn
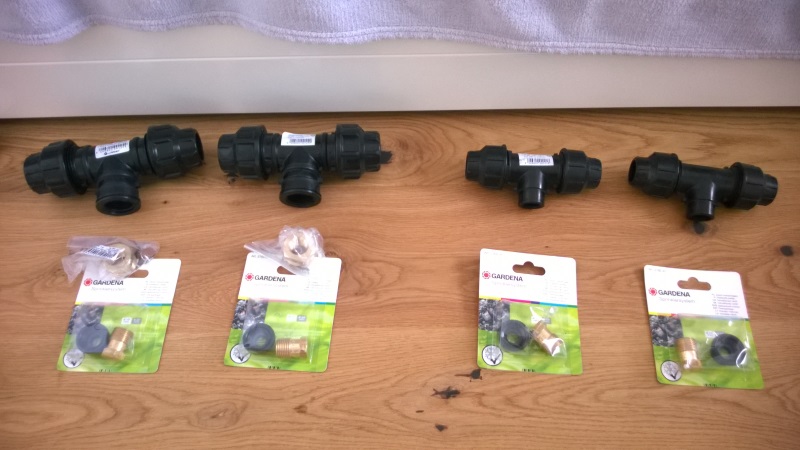
For this area it is obvious that sprinklers are the preferred option. There are many wide known brands starting from the hobby markets popular Gardena, towards the more professional systems from Rain Bird or Hunter. Each one provides wide range of products, so either you need to go through the specs and draw your garden plan or you can use one of the online planners to help you with the design.

Based on my own research I decided to use Hunter’s MP 2000 rotators. I placed these in all corners of my grass dedicated area which has rectangular shape with an arc side in the back of the garden. It was not a problem to adjust the angle of each or the sprinkler to cover the whole area. Watch this video to understand the options. BTW, here is how I was preparing my new lawn.
Decorative garden
For this part of the garden I decided to use a drip hose. Mostly, because I would not be able to cover the various complicated shapes that either adjacent to the terrace or neighbouring garden that you don’t want to make wet.
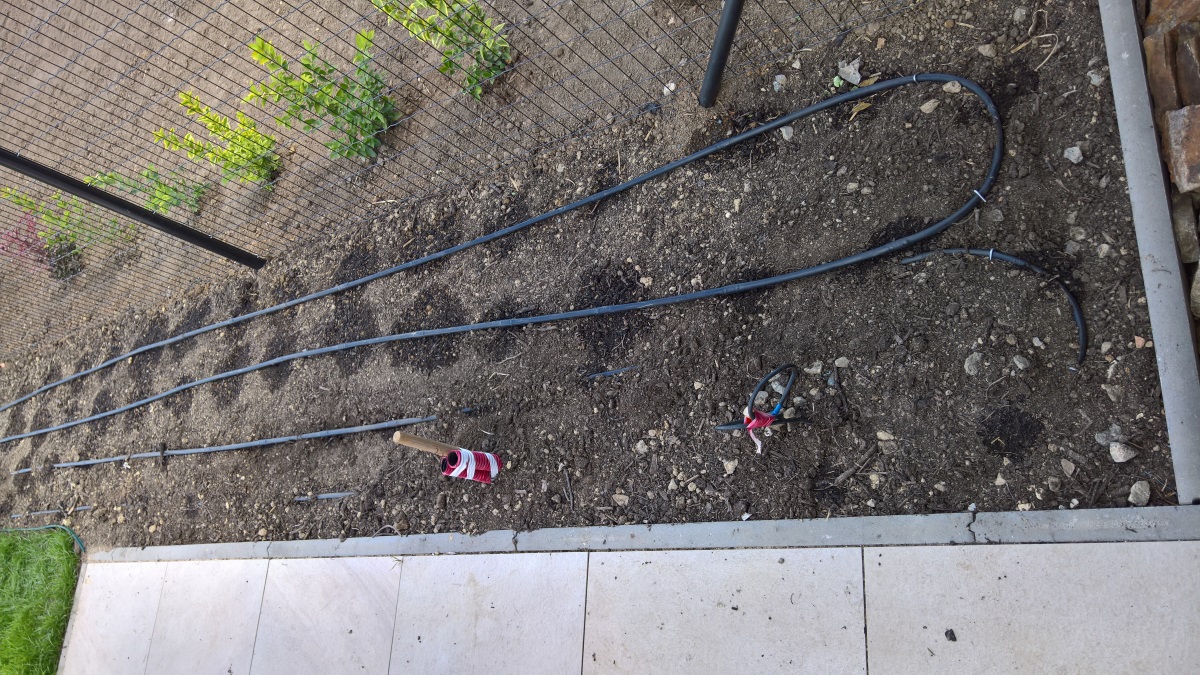
Moreover, using drip hose you can reduce the water consumption by watering only the required places and also you minimise the evaporation I purchased 100 m of the drip hose which I placed on the soil and secured with pins. You can cover these easily with garden foil against weeds and natural pine bark mulch.
Seasonal vegetable part
This part was the trickiest one, because the use of the area is changing during the season year over year. Initially I thought I will leave this part from automated watering, but I placed there at least the Gardena Water Connector from their pipeline series allowing to connect anything in the future.
Now, after a year of use, I solved watering of this area with Micro-Drip system from Gardena, mainly due to the great flexibility it provides. But it leaves the door open for anything else to be connected to this irrigation section.
The system at glance
Based on the description above my system consists of three individual sections.
- Lawn – Sprinklers
- Decorative garden – Drip hose
- Seasonal vegetable garden – Water socket
This represents three individually controlled pipes using solenoid valves. These solenoids are usually connected to pipe manifolds placed in underground boxes, but I was a bit scared of leaving these things full of water throughout the winter seasons where the ambient temperature can reach -16°C without any problems. So, in my case all splitting to individual sections incl. the solenoids, manifold and filtering is done inside the house/cellar. You could connect the system to your water distribution system there, but my idea was to use rain water from an underground tank I installed next to the house.
Water source – The pump
To use rainwater as the water source for your sprinklers I had to install a pump and a water filter to the system. The pump I have is Divertron Easy E-Deep 1000. It is fully automated pressure pump that sits under the water in the tank. It is not only very powerful, but it has some clever features like automatic shutdown when the water reaches the bottom end, or when the output pipe is closed. It is designed to work the way that you leave the pump always on, and it starts once the pressure in the pipe drops by opening valve and stops once you close the output. Even though I am not using it this way, it is good protection of the pump against running dry or accidental run against closed output.

Rainwater tank
The rainwater tank I have used is an underground plastic tank with the total capacity of 6000 litres. It might sound huge, but if I could, I would invest into a bigger one. During really dry weeks the water gets consumed very quickly, and when it really rains (for instance overnight), the tank cannot absorb more water.

For smarthome integration it is good to think of the following cabling:
- Standard 230V cable coming from the relay to connect the pump
- STP cable for any water level measuring device, to be able to monitor and visualise the remaining water amount in the tank (eg. Ultrasonic level sensor …)
Controlling the valves
This is the trickiest part. The standard solenoids used for garden watering systems are designed for 24V. However, it is important to say, that it is 24 AC! As it was not explicitly mentioned on the ones I purchased, you can imagine what happened.
Do not run AC solenoid valves on DC!
By running these solenoid valves on 24V DC (instead of 24V AC) you’ll not notice anything suspicious on the first sight. Everything will work like normal except…. that the coil of valves will be overheating due to the increased current running through it. There is an interesting article about this I recommend to read.
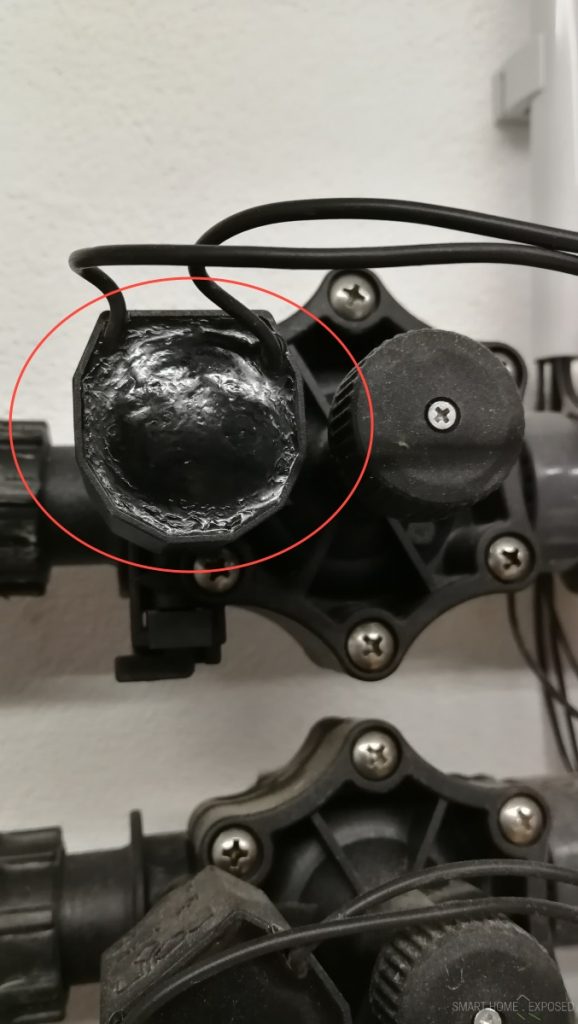
See what happened to my solenoid after several days of watering using DC power supply. (Red circle is showing melted surface). If you connect 24V DC to a solenoid valve that was designed (and most of these are) for AC, the DC current flowing through the coil will be much higher (almost 1 A on DC, compared to ~200mA when on AC) and the coil will quickly start overheating.
As there is no easy way how to convert DC back to AC, you will need 24V AC power supply to control the valves. For the smart home integration this means an additional PSU, and free relays for each of the valve (section). If you not feel comfortable to let your 24V AC PSU running 24/7, an additional relay will be required to be able to switch the supply on and off.
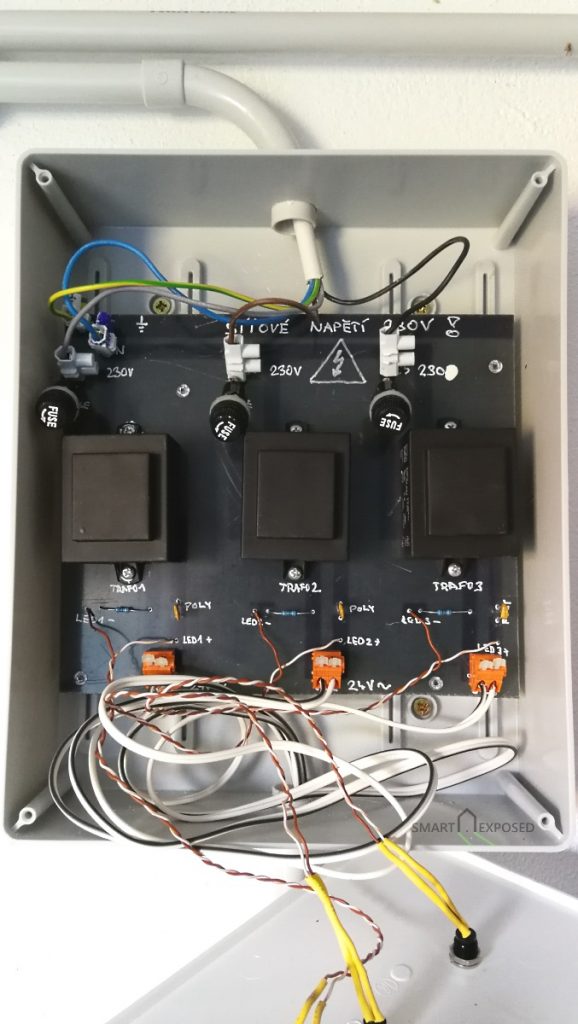
Solenoid valve control board
Another option is to have small dedicated transformers for each of the valve which is what I did in my installation. I just purchased three of these and soldered a small control board with added fuse and poly switch for each section. Now my 3 relays on Loxone Extension are just switching 230V like for any other load, and this goes to three individual small transformers to create 24V AC for the solenoid valves. This way I saved one relay output on extension and do not have any PSU running all day long at the same time.
Solenoid valve control (inside) 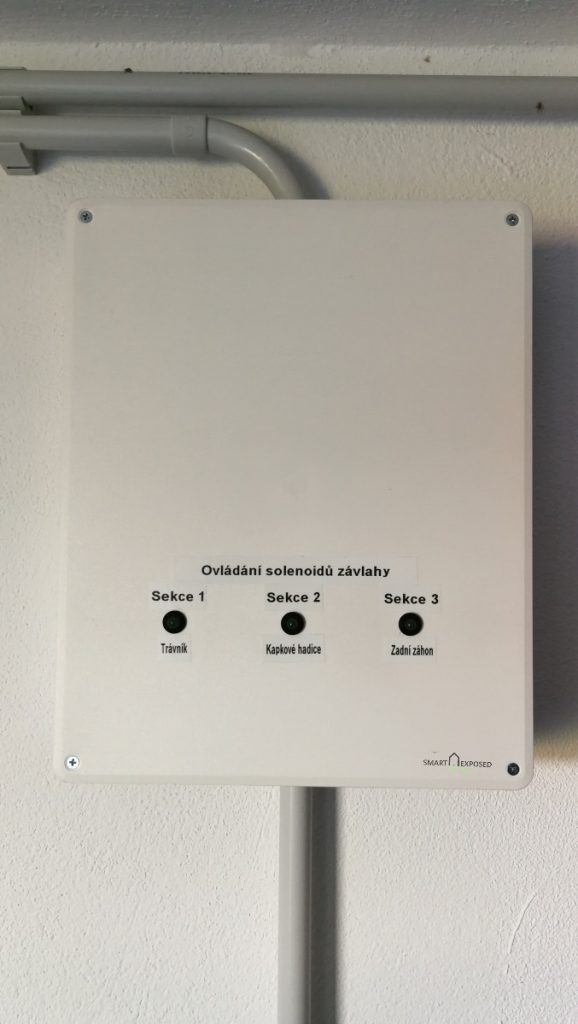
Solenoid valve control
As you can see, there are three identical channels (top to bottom) for three irrigation valves/sections. It is connected by standard 230V 5 wire 3 phase cable with the standard color coding: Earth (yellow-green), Neutral (blue), and three relay switched Phase lines (grey, brown, black). Each of these goes to individual fuse first (protection in case anything happens to the transformer), then to the transformer input, and then finally the transformer output goes to poly-switch (overload transformer protection) and to the output terminals. There is also a resistor for LED connected to the front panel which indicates which section is in operation.
- PolySwitch (PTC) 0,4A/60V
- Transformer 24V 10W (Iout=416 mA, dimensions: 60 x 42,3 x 34,6 mm)
- Fuse holder (I am using slow fuses 50 or 100 mA)
- and few terminals, resistors and LEDs.

As always, there is a risk of electric shock/injury when working on devices connected to mains voltage! Make sure you understand all the consequences, you’re tech-savvy and you know what are you doing when designing electronic circuits and working on the wiring. Devices, that are meant to be operated on public do need to follow safety standards (electrical safety, insulation, intrusion protection) and so on. Please, keep that in mind when creating any electrical devices. If you’re not sure, contact your local electrician. If you’re interested in more details about the control board, please read the the following post about the updated version of the board.
Water level measurement
For water level monitoring the good option is to use ultrasonic sensors. These will give you the distance from the sensor to the actual water level. Based on your tank depth you could try UB2000-F42-U-V15
UB4000-F42-U-V15 or UB6000-F42-U-V15 which is the one Loxone is/was offering in their materials as well. The operating voltage is from 17 to 30 V DC, and the output is analogue 0..10 V, so there should not be any issues when connecting these with Loxone Extension.
I don’t have any hands on experience with these yet, but I will definitely publish an update once I install one. Here is a forum topic about the ultrasonic water level sensors.
In case these ultrasonic sensors are not suitable for your type of measurement, have a look at these pressure level sensors. There are versions that do have 0-10 V output. See my post about water level measurement and sensors.
External water top-up from different source
I am using the 6000 liter rainwater tank for the second season already and can tell that it is not enough to automatically irrigate my back part of the garden (~160 m2) during hot summer periods.
To get around this I preinstalled additional pipe that will be used for automated refilling of the tank when needed. I will use the water level data and some logic around the weather conditions to maintain the solenoid valve opening times. Also, the plan is to have dedicated meter for this appliance and sign up for lower water charge (without sewer rate).
Integration with smarthome system
To control the irrigation, I am using the following data from the sensors:
- Outdoor temperature (If the temperature is below 7°C I am blocking the watering schedule)
- Outdoor humidity (If the humidity is above 80% I am blocking the watering schedule)
- Rain sensor (If it rains I am blocking the watering schedule)
- Soil humidity (Here I am in the middle of experimenting with the Soil Moisture Sensor from Vegetronix)
If you want to be super geeky, you could also add another conditions to the programing, like in case of strong wind (based on the data from the Loxone wind sensor) the irrigation period will be blocked. Or you could have different presets in case the water level in a tank is low and so on. There are plenty of possibilities how to use the data you gather and the decisions you make based on that.
But to go back to the basics, you obviously don’t need all these sensors to automate the garden irrigation. For instance, if it rains, it also impacts the outdoor air humidity and subsequently the soil humidity as well, so you not necessarily need to have for instance rain sensor installed. I did play with that a bit just simply because I do have these other sensors installed for other purpose already (the rain sensor to close my roof Velux windows in case of sudden rain, for example).
Programming
For programming purposes, I used three different weekly timer blocks, each for one section/solenoid. Then there is additional logic that block the watering based on the data from the sensors I explained above. Also, it is good to have the option to turn the water on manually, which I have done using the radio-button function and timer, set to 15 minutes, after which the system returns back to the automated state.
Maintenance
The only maintenance I have to do is to tweak the program according to the watering needs of each of the garden section. Apart from that, the only thing I should do is to clean the water filter on the main pipe from the pump. I did that once already, but here was almost nothing to be removed/cleaned. But this depends on the local conditions how clean your rain water is, how many organic parts are flushed out from the roof.
Winter season prep
In my original plan I had counted with three automated drain valves from Gardena, one for each section. I already purchased these incl. the connection T-block to the pipe, but during the construction works I decided not to use these for two main reasons:
- The drain valve needs to be located in the lowest point of the irrigation system/section and, for safe drainage, installed in a pack of washed coarse gravel. In my case this would be below the nice stony pavement area I would not want to damage in case of any valve failure. Any the worst-case scenario is that the valve remains open resulting in permanent leakage from the system.
- I have been assured, that the main parts (underground hoses and sprinklers) are frost resistant. The only risky element would be the solenoids where I would expect higher probability of failure after winter season. In my setup, however, I placed all these inside the house (cellar) where we don’t get normally temperatures below 0°C. The only I can say is that I have not done any preparation for the last winter season and there was no damage even though the outside temperatures were sometimes below -16°C. Certainly there are many factors that can influence the frost resistance (pipes and sprinklers type, garden profile, underground depth, …) so please don’t send me any complaints about your irrigation system damages. This is entirely up to your best guess how to prepare the system for the winter periods.
Final recomendations
- Try to use rain water to save tap water bill
- Think of tank refilling pipe/valve and control to be able to top-up the tank during dry periods
- Install only good pressure pump (the cheap hobby market “super deals” would not have enough pressure to feed the system properly
- Don’t forget to install water filter before the solenoid manifold to make sure that no dirt parts block the valves
- Think about the placement of the solenoid valves and number of sections your garden will require
- Do not underestimate the winter freezing period and its impact to your irrigation system
- Do the planning and pipe installation at the same time you start turning your property into nice garden
- Ask your electrician how to design and place the mains socket for the pump to avoid any hazardous situations!
Update: Please read my update on the solenoid valve control.
What could we do better?


Can you share your code with us?
Hi, very nice article ! thanks for it ! I am bit interested in that small transformers, may i kindly ask for any picture of that small control board you made … how it finally looks ? when one transformer will go down ? how you will notice ? in big PSU, all will be turned off, so you easily notice, but more garden sections = more small units .. if one will be down ? can be missed or ? what do you think, i am planning to have 7 sections ..
And yep , can add myself to request above, how you made loxone program, do you somehow adjust times of running regarding month and need of water, in program or i understood it correctly and you do manually, what you describe as maintenance ..
Thanks in advance !
Hi Peter,
thanks for reminding me to post the answers here. I was quickly checking my photos but I couldn’t find a one showing the board itself. Will take a picture in the upcoming days and publish it here.
With the programming itself…, I know I owe this but, I need to polish it a bit to be ready for public 🙂 The thing is that in the Loxone config this does not look nice and tidy, and there is still some work in progress. But I will try to add that part to the post soon as well.
Basically, I do have three different irrigation circuits, for each I use a schedule block. That gives mi the option to have different plans for each area, and use the override function to either manually initiate when I want to, or disengage the watering for certain period. But there is additional logic, that blocks the schedule from executing whenever there is low outdoor temperature, high outdoor humidity or high soil humidity. The first was meant as winter protection, but this needs to be improved (recent winter times are becoming warmer so this will need to be seasonal approach), the second works fine and protects from running the irrigation after or during rain period, the third (the soil humidity) works similar, however my soil humidity sensor placement will need to be changed in order to get more instant results.
As for maintenance, I wanted to have the system maintenance free. Typical garden installers will tell you to drain the system before winter and inspect after (check the filter and so on). I am not draining it for 3 years already, but I am thinking of a SW switch that would start each irrigation season manually. It is not that important probably, but I think it is safe to check everything is in a good shape at the first run after winter, so I want to make sure to be there 🙂
Other than that, the rest of the maintenance is pure SW / Visualization control, where I think it is very hard to automate the need for water depending on the type of vegetation you might have. I am not talking here about grass lawn, but rather some vegetables or similar, and there is different vegetation period for different cultures. So it is not “one size fits all” approach, but I have to adjust it slightly (for instance block a section once peas is harvested).
I hope this makes sense.
I have expanded the section “Controlling the valves” by adding more details and pictures. The transformers are fused and there is LED indicator for each section so you instantly see which one is in operation.